Smash DI Mechanics
Introduction
The purpose of this guide is to explain how DI works in Smash 64. The “Basics” section covers what DI is in simple terms and how to start incorporating it into your gameplay. The “Advanced” section goes into the details of how exactly DI works, so skilled players can better understand how to get the best DI possible. The “Conclusions” section contains some of my own conclusions drawn from the information in the “Advanced” section.
Basics
DI, called “SDI” in later Smash titles, is a mechanic present in all Smash games that allows a player to move slightly as they are hit. This technique is extremely important in Smash 64, as it allows the defending player to escape otherwise guaranteed combos. There are two main ways to DI, “tapping” and “sliding”. To tap DI, quickly tap the joystick in the direction you wish to move as you’re hit. Make sure to return the joystick close to the center in between each tap. To slide DI, move the joystick to the cardinal direction you want to DI in, then move the joystick up and down. You can see two examples of how to slide DI here and here. Note that DI only applies during the hit, but in a long combo there’s usually no harm in continuing to input DI in between hits, you just won’t get anything out of it.
Advanced
Definitions
To discuss in detail how DI works, we’ll need to define some terms. Feel free to skip them if you already know what they mean.
Hitlag - Hitlag is a “freezing” effect that occurs when a player is hit by a move. Hitlag occurs after the first frame a move hits, and before the defending player receives knockback and hitstun. Projectile moves cause only the defending player to be affected by hitlag. Non-projectile moves cause both parties to be affected by hitlag. Characters undergoing hitlag appear to move around slightly, but this movement does not affect their actual position from the game’s perspective. Characters undergoing hitlag cannot use any moves.
DI Frames - DI frames are frames during hitlag during which the defending player is able to DI. Attackers never receive DI frames.
(X,Y) Notation - To keep track of joystick position, the game uses X and Y position, each of which varies from -128 to 128, centered at 0. For example, a joystick at (10,0) is slightly to the right of the center, while a joystick at (-50,50) is to the left and up from the center. Note that joystick values can never contain decimals.
Range - Range is a measurement of the maximum input value of a joystick. A perfect condition OG has a range of about 85, meaning the highest value it’s able to achieve in any direction is 85.
DI Frame Mechanics
The amount of DI frames the defending player receives for a single-hit move is equal to the amount of damage the move did, divided by 3, plus 4, rounded down. Written another way, n = floor(d/3)+4. For example, Captain Falcon’s up-air deals 16 damage, so a player hit by it receives 16/3+4=9.333 rounded down = 9 DI frames. Note that staling counts, so while a fresh Falcon uair deals 9 DI frames, a completely stale one only deals 8. Moves with the “electric” property, such as Pikachu’s down-air and Samus’s charge shot, deal additional hitlag beyond what is normal for their damage values. However, I have so far been unable to calculate a formula for the increased hitlag from electric type moves.
DI Input Mechanics
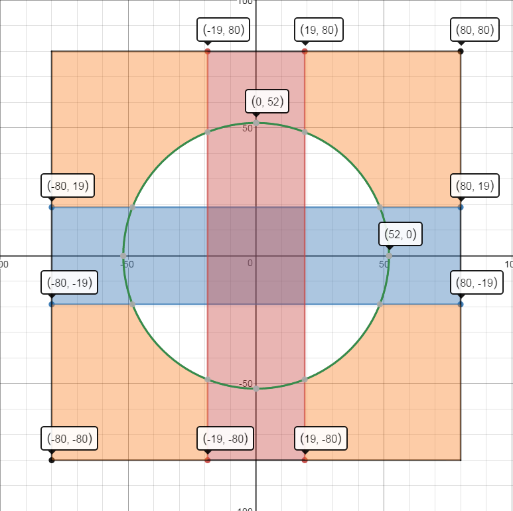
The picture above shows a map of possible joystick inputs on a coordinate grid. Each colored section has significance in how the game processes DI inputs.
Range Mechanics
-
To receive DI on a frame, your joystick must be outside the green circle shown on the grid for that frame. The circle has a radius of 52.
-
DI distance applies separately to X-axis and Y-axis movement. For example, the X-axis movement of a DI input at (60,60) is the same as the X-axis movement of an input at (60,0), and the Y-axis movement is the same as the Y-axis movement of an input at (0,60). See the GIF above.
- DI distance scales with distance from the center. For example, (80,0) will move your character farther to the right than (60,0). See the GIF above.
- The black square in the picture extends from (80,80) to (-80,-80). Inputs outside this range are truncated, and give no additional DI. For example, (128,70) gives the same DI as (80,70).
Activation Mechanics
These rules define how the game decides whether or not you’ll get DI or a particular frame. Again, refer to the square diagram above.
- If on the previous frame you inputted a value in the blue or red box, and on this frame your input is not in that box, you’ll receive DI on this frame. If you were in both boxes (the center purple square) last frame, you only need to leave one of them to receive DI, not both.
- If on the previous frame your input was on the other side of the red or blue box, you’ll receive DI. For example, if last frame you inputted (60,0), and this frame you input (-60,0), you’ll receive DI because your previous input was on the other side of the red box.
- If neither of the above is true, you will not receive DI.
Conclusions
In general, DI behaves mostly according to the popular conception. One important area where this is not the case is in regards to range. It’s commonly believed that the Hori and other similar controllers have an advantage over the OG purely because of their range. While range does matter, gate shape is an overlooked factor that can heavily impact whether a controller can make good use of its range. A Gamecube controller using the Raphnet adapter, has a maximum range of 80, while an OG in great condition has a maximum range closer to 85. However, the GC has an advantage in DI ability because of its square gate, which makes movements perpendicular to the DI direction possible